Fork me on GitHub

初尝itchat

前言

今天又是熊熊烈日的一天啊,只能宅在空调房里刷刷知乎。发现了一个好玩的Python接口——“itchat,它是一个开源的微信个人号接口,使用python调用微信从未如此简单”,这是官网的介绍啦。这个是itchat的Github地址,接下来便看看文档进行了一些恶趣味测试,从骚扰基友到变身聊天机器人,统计微信好友信息,最后总结出我为什么单身。

从骚扰基友到变身聊天机器人

仔细思考一哈,骚扰基友主要有三步:登录、获取目标、发送消息。嗯,可以开始了。

登录

登录有itchat.login()itchat.auto_login()两种方法:

1
2
3
import itchat

itchat.login() # 登录微信,会弹出一个二维码,扫描登录网页版微信
1
2
3
import itchat

itchat.auto_login(hotReload=True) # 第一次需要扫码,之后只需要手机端确认登录

获取特定好友

我们要给好友发送消息,首先需要获取好友列表,然后从中选择想要发送消息的好友。使用itchat.get_friends()抓取好友列表,然后使用itchat.search_friends()获取特定的好友,这里使用备注名获取好友,然后取满足要求的第一个好友。

1
2
3
4
5
friends = itchat.get_friends(update=True)[0:]  # 爬取微信好友

names = itchat.search_friends(remarkName='remarkName') # 返回备注名为‘remarkName’的用户列表,可选的参数还有昵称nickName,微信号wechatAccount,唯一标识符userName

target = names[0] # 取列表第一个User对象,其实都是字典,属性有userName、昵称、微信号、备注名、头像url等

发送消息

发送消息主要使用itchat.send()方法,发送的内容可以是很多种形式,包括text、img、video、file,发送成功返回True,失败返回False。对于不同的消息内容也分别有对应的方法,比如send_msg()、send_file()、send_img、send_video(),但官网推荐使用send()。下面是发送消息的代码例子,最后注释部分是群发所有好友,谨慎使用。

1
2
3
4
5
6
7
itchat.send('Hello remarkName, I love U more than I can say!', toUserName=target['UserName'])  # 发消息咯,第二个参数为userName,特定的一串hash码
itchat.send('你今天怎么这么奇怪?', toUserName=target['UserName'])
itchat.send('怪可爱的!', toUserName=target['UserName'])

# # 给所有好友发送消息
# for friend in friends[1:]: # friends第一个元素为自己,所以去掉
# itchat.send(friend['RemarkName']+',好久不联系了,甚是想念~', toUserName=friend['UserName'])

骚扰一下

结合上面三部分代码,就可以开始打扰一下啦,全部代码如下,需要修改remarkName为目标备注名

1
2
3
4
5
6
7
8
9
10
11
12
13
14
15
16
17
18
import itchat

itchat.auto_login(hotReload=True) # 第一次需要扫码,之后只需要手机端确认登录

friends = itchat.get_friends(update=True)[0:] # 爬取微信好友

names = itchat.search_friends(remarkName='remarkName') # 返回备注名为‘remarkName’的用户列表,可选的参数还有昵称nickName,userName

target = names[0] # 取列表第一个User对象,其实都是字典,属性有昵称、userName、微信号、备注名、头像url等

# 发消息咯,第二个参数为userName,特定的一串hash码
itchat.send('Hello remarkName, I love U more than I can say!', toUserName=target['UserName'])
itchat.send('你今天怎么这么奇怪?', toUserName=target['UserName'])
itchat.send('怪可爱的!', toUserName=target['UserName'])

# # 给所有好友发送消息
# for friend in friends[1:]: # friends第一个元素为自己,所以去掉
# itchat.send(friend['RemarkName']+',好久不联系了,甚是想念~', toUserName=friend['UserName'])

首先给同在宿舍的A君来一发:

可以,认真复习的男人真是高冷,只能靠发红包来联系感情了,那就给在图书馆自习顺便看妹的H哥来一发吧:

欸,果然没有认真自习,秒回。试试我们的好朋友,小哪吒X吧:
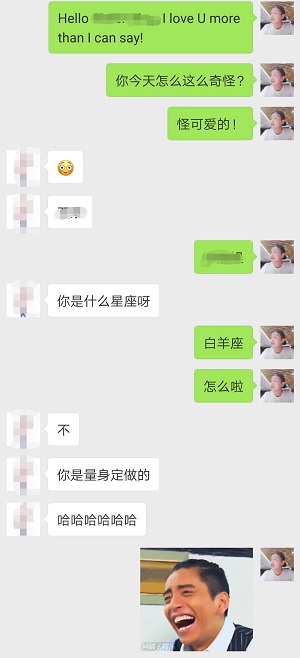
啊,没想到被小哪吒反撩了,我果然还是太年轻

实现一个聊天机器人

这个时候,就想要实现一个自动聊天的机器人了。首先套用官方的自动回复模版,然后重写自己想要修改的方法,各个方法的作用我都写在了注释里,模版如下:

1
2
3
4
5
6
7
8
9
10
11
12
13
14
15
16
17
18
19
20
21
22
23
24
25
26
27
28
import itchat, time
from itchat.content import *

@itchat.msg_register([TEXT, MAP, CARD, NOTE, SHARING]) # 消息内容为文本、地图、名片、通知、分享类型时的回复方法
def text_reply(msg):
msg.user.send('%s: %s' % (msg.type, msg.text))

@itchat.msg_register([PICTURE, RECORDING, ATTACHMENT, VIDEO]) # 消息为图片、语言、附件、视频的回复方法
def download_files(msg):
msg.download(msg.fileName)
typeSymbol = {
PICTURE: 'img',
VIDEO: 'vid', }.get(msg.type, 'fil')
return '@%s@%s' % (typeSymbol, msg.fileName)

@itchat.msg_register(FRIENDS) # 好友邀请类型回复方法
def add_friend(msg):
msg.user.verify()
msg.user.send('Nice to meet you!')

@itchat.msg_register(TEXT, isGroupChat=True) # 群消息类型回复方法
def text_reply(msg):
if msg.isAt:
msg.user.send(u'@%s\u2005I received: %s' % (
msg.actualNickName, msg.text))

itchat.auto_login(True) # 登录
itchat.run(True) # 运行

模板回复Text的方法就是直接回复消息类型加消息内容,十分简单,就像小时候跟小伙伴拌嘴,你说啥他就说啥怼你,就很无聊。所以准备先修改这个方法实现自己想要的效果,哈哈哈哈哈,结果写的时候,用旧手机号注册一个小号debug太频繁,被Web微信封了,两周后解封。

所以就放弃按自己想法写的计划了,直接套用这个开源的聊天机器人项目,这个小项目是调用了图灵机器人的API,这个是API的调用文档。在回复文本信息的方法中,调用一个get_tuling_reply()方法。

1
2
3
4
5
@itchat.msg_register([TEXT, MAP, CARD, NOTE, SHARING])
def text_reply(msg):
# print(type(msg.user))
# print(msg.user['NickName'])
msg.user.send(get_tuling_reply(msg))

get_tuling_reply()的代码,这个方法用来传递msg消息调用图灵机器人API,并处理图灵机器人不好使的异常情况。

1
2
3
4
5
def get_tuling_reply(msg):
# 如果图灵Key出现问题,那么reply将会是None
reply = get_response(msg['Text'])
# a or b的意思是,如果a有内容,那么返回a,否则返回b, 为了保证在图灵Key出现问题的时候仍旧可以回复,这里设置一个默认回复
return reply or 'I received: ' + msg.get('Text')

其中调用了一个get_response()方法,这个方法就是用来调用图灵机器人API的,用来获取msg的回复内容。

1
2
3
4
5
6
7
8
9
10
11
12
def get_response(msg):
url = 'http://www.tuling123.com/openapi/api'
data = {
'key': '75137612d89c42f0b9d7a3f5133ec656', # 这个key可以直接拿来用,随便用,无所谓,放心公开
'info': msg, # 传递好友发送的消息
'userid': 'pth-robot',
}
try:
r = requests.post(url, data=data).json() # 接收图灵机器人返回的json文件
return r.get('text') # 返回图灵机器人回复的文本内容
except:
return

到这Text部分的修改就完成了,下面是autoreply.py的全部代码:

1
2
3
4
5
6
7
8
9
10
11
12
13
14
15
16
17
18
19
20
21
22
23
24
25
26
27
28
29
30
31
32
33
34
35
36
37
38
39
40
41
42
43
44
45
46
47
48
49
50
51
52
53
54
55
56
57
58
59
import itchat
import requests
from itchat.content import *


def get_response(msg):
url = 'http://www.tuling123.com/openapi/api'
data = {
'key': '75137612d89c42f0b9d7a3f5133ec656', # 这个key可以直接拿来用,随便用,无所谓,放心公开
'info': msg,
'userid': 'pth-robot',
}
try:
r = requests.post(url, data=data).json()
return r.get('text')
except:
return


def get_tuling_reply(msg):
# 如果图灵Key出现问题,那么reply将会是None
reply = get_response(msg['Text'])
# a or b的意思是,如果a有内容,那么返回a,否则返回b, 为了保证在图灵Key出现问题的时候仍旧可以回复,这里设置一个默认回复
return reply or 'I received: ' + msg.get('Text')


@itchat.msg_register([TEXT, MAP, CARD, NOTE, SHARING])
def text_reply(msg):
# print(type(msg.user))
# print(msg.user['NickName'])
msg.user.send(get_tuling_reply(msg))


@itchat.msg_register([PICTURE, RECORDING, ATTACHMENT, VIDEO])
def download_files(msg):
msg.download(msg.fileName)
type_symbol = {
PICTURE: 'img',
VIDEO: 'vid', }.get(msg.type, 'fil')
return '@%s@%s' % (type_symbol, msg.fileName)


@itchat.msg_register(FRIENDS)
def add_friend(msg):
msg.user.verify()
# print(type(msg.user))
# print(msg.user)
msg.user.send('终于等到你!') # 在这做了简单的修改,本来是想回复带NickName的,但是NickName为空报错了。


@itchat.msg_register(TEXT, isGroupChat=True)
def text_reply(msg):
if msg.isAt:
msg.user.send(u'@%s\u2005I received: %s' % (
msg.actualNickName, msg.text))


itchat.auto_login(True)
itchat.run()

代码写好了,自然要看看效果呀,就冒着被封号的危险用大号尝试了一下,用小号给大号发消息,效果截图:

嗨呀,这么会撩,要不就用大号一直挂着好了。

统计微信好友数据

这部分主要联系一下Python画图,统计一下好友性别分布,地区分布和创建个性签名关键词云,从而在一定程度上反映我单身的原因。最后将所有好友头像拼接成一张大图,看起来不错。

爬取数据

统计对象是数据,首先需要爬取数据嘛,然后保存下来。先定一个主函数,登录Web微信,爬取好友信息保存到friends中,跟获取特定好友的步骤一样,然后遍历friends,将所有好友信息保存到一个list中,然后分别调用保存信息方法和下载头像方法。

1
2
3
4
5
6
7
8
9
10
11
12
13
14
if __name__ == '__main__':
itchat.auto_login(hotReload=True)

friends = itchat.get_friends(update=True)[1:] # 获取好友信息,除了自己
friends_list = []

for friend in friends:
item = {'NickName': friend['NickName'], 'HeadImgUrl': friend['HeadImgUrl'], 'Sex': sex_dict[str(friend['Sex'])],
'Province': friend['Province'], 'Signature': friend['Signature'], 'UserName': friend['UserName']}
friends_list.append(item) # list添加当前好友信息
# print(item)

save_data(friends_list) # 将好友信息写入json文件
download_images(friends_list) # 下载好友头像

然后是保存好友信息的方法,需要加载os、codecs、json模块:

1
2
3
4
5
6
7
8
9
10
# 保存好友信息
def save_data(friend_list):
data_dir = './data/' # 创建目录
if not os.path.exists(data_dir):
os.mkdir(data_dir)
out_file_name = "./data/friends.json"
print('begin to save friends data')
with codecs.open(out_file_name, 'w', encoding='utf-8') as json_file:
json_file.write(json.dumps(friend_list, ensure_ascii=False)) # 写入文件
print('end process')

下载头像的方法,需要加载os模块:

1
2
3
4
5
6
7
8
9
10
11
12
13
14
# 下载好友头像
def download_images(frined_list):
image_dir = "./images/"
if not os.path.exists(image_dir): # 创建目录
os.mkdir(image_dir)
num = 1
print('begin to save friend avatar')
for friend in frined_list: # 遍历保存头像
image_name = str(num) + '.jpg'
num += 1
img = itchat.get_head_img(userName=friend["UserName"])
with open(image_dir + image_name, 'wb') as file:
file.write(img) # 保存当前头像
print('end process')

综合起来代码如下,添加了一个字典,将json中代表性别的1、2转化为男、女:

1
2
3
4
5
6
7
8
9
10
11
12
13
14
15
16
17
18
19
20
21
22
23
24
25
26
27
28
29
30
31
32
33
34
35
36
37
38
39
40
41
42
43
44
45
46
47
48
49
50
51
import os
import codecs
import itchat
import json

sex_dict = {'0': "其他", '1': "男", '2': "女"}


# 下载好友头像
def download_images(frined_list):
image_dir = "./images/"
if not os.path.exists(image_dir):
os.mkdir(image_dir)
num = 1
print('begin to save friend avatar')
for friend in frined_list:
image_name = str(num) + '.jpg'
num += 1
img = itchat.get_head_img(userName=friend["UserName"])
with open(image_dir + image_name, 'wb') as file:
file.write(img)
print('end process')


# 保存好友信息
def save_data(friend_list):
data_dir = './data/'
if not os.path.exists(data_dir):
os.mkdir(data_dir)
out_file_name = "./data/friends.json"
print('begin to save friends data')
with codecs.open(out_file_name, 'w', encoding='utf-8') as json_file:
json_file.write(json.dumps(friend_list, ensure_ascii=False))
print('end process')


if __name__ == '__main__':
itchat.auto_login(hotReload=True)

friends = itchat.get_friends(update=True)[1:] # 获取好友信息,除了自己
friends_list = []

for friend in friends:
item = {'NickName': friend['NickName'], 'HeadImgUrl': friend['HeadImgUrl'], 'Sex': sex_dict[str(friend['Sex'])],
'Province': friend['Province'], 'Signature': friend['Signature'], 'UserName': friend['UserName']}

friends_list.append(item) # list添加当前好友信息
# print(item)

save_data(friends_list) # 将好友信息写入json文件
download_images(friends_list) # 下载好友头像

跑一次就可以得到想要的数据咯。

男女比例

首先做一个简单的统计,得到我的票圈男女比例。首先加载数据Json文件:

1
2
3
in_file_name = './data/friends.json'
with codecs.open(in_file_name, encoding='utf-8') as f:
friends = json.load(f)

然后对性别进行统计,使用collections中的Counter来进行计数。然后使用pyecharts进行画图,因为pyecharts需要的参数为list,而sex_counter是一个字典,所以先把它转化为两个list。转化后调用get_pie()得到饼状图:

1
2
3
4
5
6
7
sex_counter = Counter()  # 性别
for friend in friends:
sex_counter[friend['Sex']] += 1 # 统计性别

# 性别
name_list, num_list = dict2list(sex_counter)
get_pie('性别统计', name_list, num_list)

dict2list():

1
2
3
4
5
6
7
8
9
def dict2list(_dict):
name_list = [] # 性别种类,男、女、其他
num_list = [] # 对应数量

for key, value in _dict.items(): # 添加到list中
name_list.append(key)
num_list.append(value)

return name_list, num_list # 返回两个list

get_pie():

1
2
3
4
5
6
7
8
9
10
11
12
13
14
15
16
17
18
19
20
def get_pie(item_name, item_name_list, item_num_list):
totle = item_num_list[0] + item_num_list[1] + item_num_list[2]
subtitle = "共有:%d个好友" % totle

# 初始化一个饼状图
pie = Pie(item_name, page_title=item_name, title_text_size=30, title_pos='center', \
subtitle=subtitle, subtitle_text_size=25, width=800, height=800)

# 往饼状图添加数据
pie.add("", item_name_list, item_num_list, is_label_show=True, center=[50, 45], radius=[0, 50], \
legend_pos='left', legend_orient='vertical', label_text_size=20)

# 保存饼状图
analyse_path = './analyse/'
if not os.path.exists(analyse_path):
os.mkdir(analyse_path)

out_file_name = analyse_path + item_name + '.html'
# print(out_file_name)
pie.render(out_file_name)

全部代码:

1
2
3
4
5
6
7
8
9
10
11
12
13
14
15
16
17
18
19
20
21
22
23
24
25
26
27
28
29
30
31
32
33
34
35
36
37
38
39
40
41
42
43
44
45
46
47
48
49
50
51
52
53
54
55
56
from collections import Counter
from pyecharts import Pie
import codecs
import json
import os


def get_pie(item_name, item_name_list, item_num_list):
totle = item_num_list[0] + item_num_list[1] + item_num_list[2]
subtitle = "共有:%d个好友" % totle

# 初始化一个饼状图
pie = Pie(item_name, page_title=item_name, title_text_size=30, title_pos='center', \
subtitle=subtitle, subtitle_text_size=25, width=800, height=800)

# 往饼状图添加数据
pie.add("", item_name_list, item_num_list, is_label_show=True, center=[50, 45], radius=[0, 50], \
legend_pos='left', legend_orient='vertical', label_text_size=20)

# 保存饼状图
analyse_path = './analyse/'
if not os.path.exists(analyse_path):
os.mkdir(analyse_path)

out_file_name = analyse_path + item_name + '.html'
# print(out_file_name)
pie.render(out_file_name)


def dict2list(_dict):
name_list = [] # 性别种类,男、女、其他
num_list = [] # 对应数量

for key, value in _dict.items(): # 添加到list中
name_list.append(key)
num_list.append(value)

return name_list, num_list # 返回两个list


if __name__ == '__main__':

in_file_name = './data/friends.json'
with codecs.open(in_file_name, encoding='utf-8') as f:
friends = json.load(f)

# 待统计参数
sex_counter = Counter() # 性别

for friend in friends:
# 统计性别
sex_counter[friend['Sex']] += 1

# 性别
name_list, num_list = dict2list(sex_counter)
get_pie('性别统计', name_list, num_list)

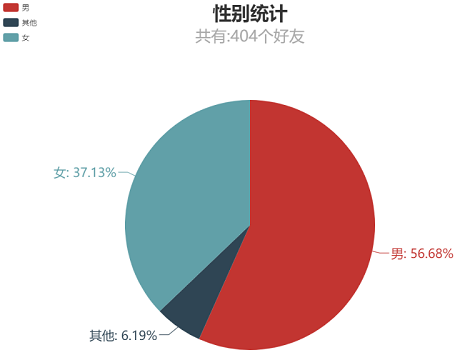
跑一次就可以得到好友饼状图啦,可以看出男性好友数量为女性好友数量的1.5倍,还有6.19%的没有备注性别的好友,我果然是个死直男。
好友省份分布

与男女比例代码差不多,就直接贴代码了:

1
2
3
4
5
6
7
8
9
10
11
12
13
14
15
16
17
18
19
20
21
22
23
24
25
26
27
28
29
30
31
32
33
34
35
36
37
38
39
40
41
42
43
44
45
46
47
48
49
50
51
52
53
54
55
56
from collections import Counter
from pyecharts import Bar
from pyecharts import Grid
from pyecharts import Map
import codecs
import json
import os


def get_bar(item_name, item_name_list, item_num_list):
bar = Bar(item_name, page_title=item_name, title_text_size=30, title_pos='center')

bar.add("", item_name_list, item_num_list, title_pos='center', xaxis_interval=0, xaxis_rotate=27, \
xaxis_label_textsize=20, yaxis_label_textsize=20, yaxis_name_pos='end', yaxis_pos="%50")
bar.show_config()

grid = Grid(width=1300, height=800)
grid.add(bar, grid_top="13%", grid_bottom="23%", grid_left="15%", grid_right="15%")

# 保存柱状图
analyse_path = './analyse/'
if not os.path.exists(analyse_path):
os.mkdir(analyse_path)
out_file_name = analyse_path + item_name + '.html'
grid.render(out_file_name)


# 因为只取前15个人数最多的省份,Counter返回的是一个list,所以转化方法不一样
def counter2list(_counter):
name_list = []
num_list = []

for item in _counter:
name_list.append(item[0])
num_list.append(item[1])

return name_list, num_list


if __name__ == '__main__':

in_file_name = './data/friends.json'
with codecs.open(in_file_name, encoding='utf-8') as f:
friends = json.load(f)

# 待统计参数
Province_counter = Counter() # 省份

for friend in friends:
# 省份
if friend['Province'] != "":
Province_counter[friend['Province']] += 1

# 省份前15
name_list, num_list = counter2list(Province_counter.most_common(15))
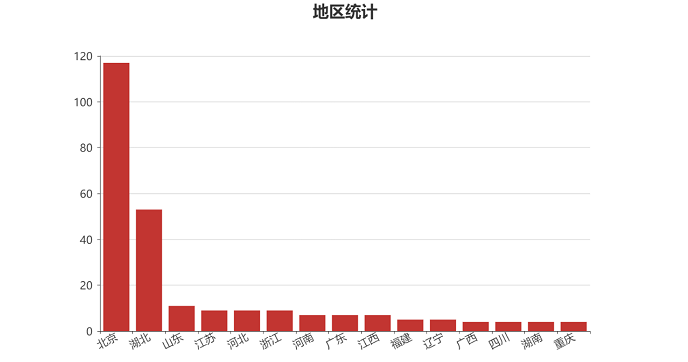
get_bar('地区统计', name_list, num_list)

运行结果:

签名云

基本步骤与上面一样,主要需要使用一个叫做jieba的分词包来进行中文分词,然后发现出现了class、emoji、span等词,所以先把它们去除掉,再进行分词,也就是去除停用词。
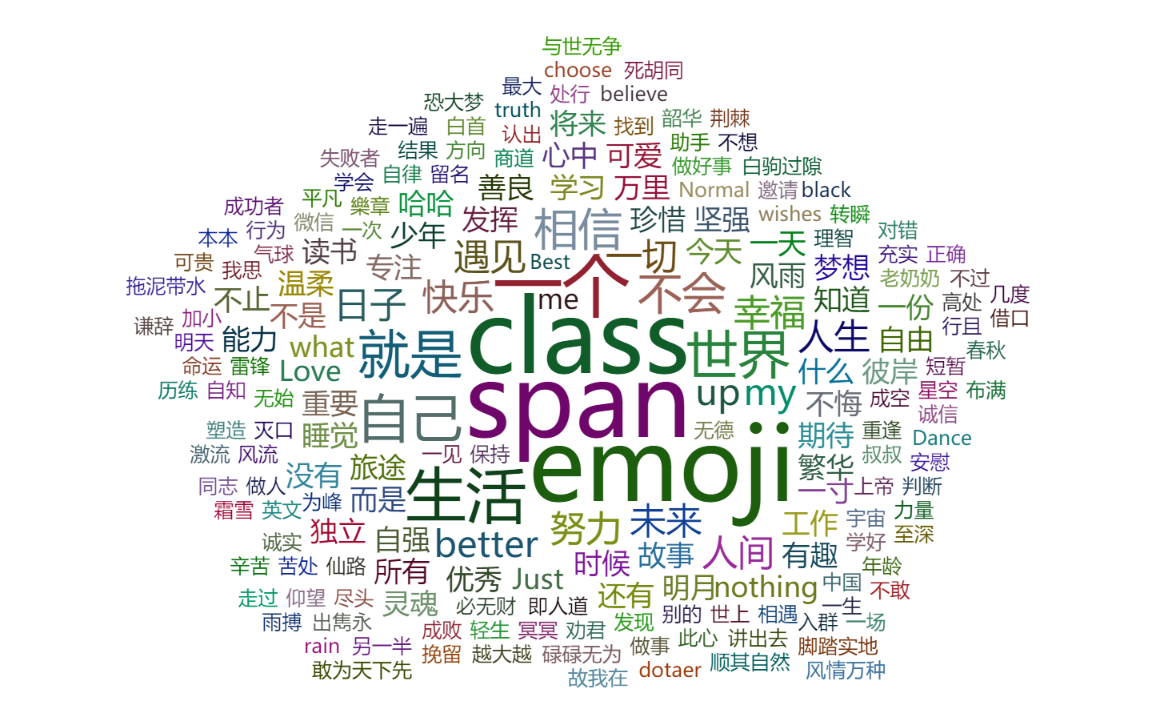
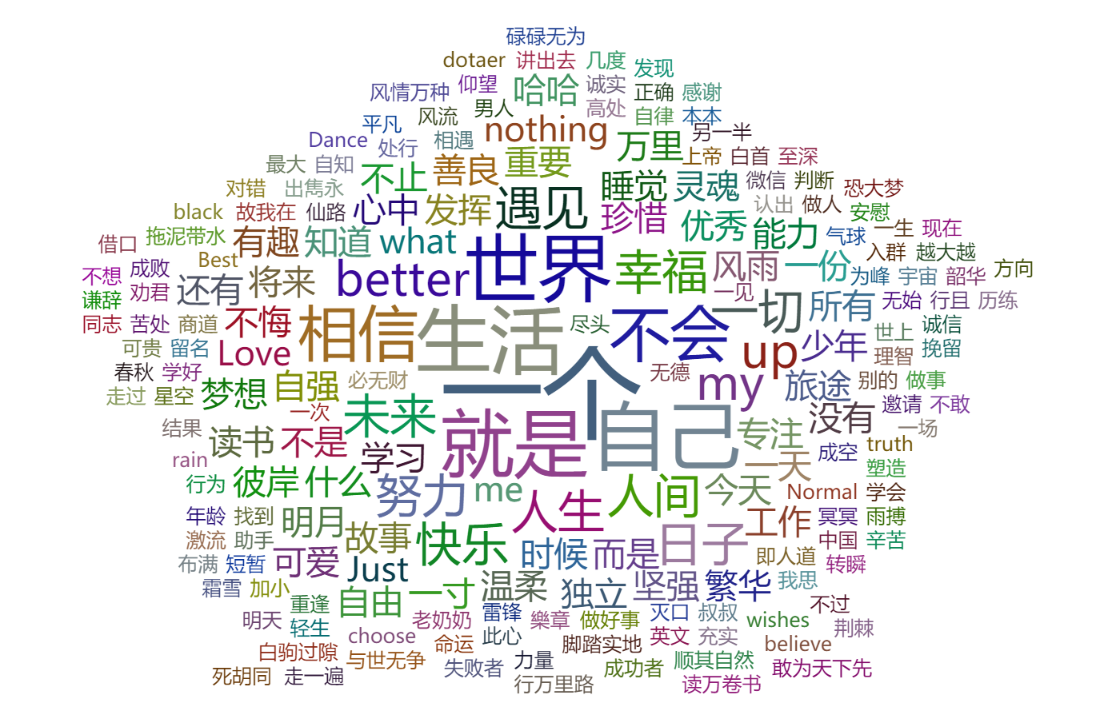
全部代码如下:

1
2
3
4
5
6
7
8
9
10
11
12
13
14
15
16
17
18
19
20
21
22
23
24
25
26
27
28
29
30
31
32
33
34
35
36
37
38
39
40
41
42
43
44
45
46
47
48
49
50
51
52
53
54
55
56
57
from collections import Counter
from pyecharts import WordCloud
import codecs
import json
import os
import jieba.analyse


def word_cloud(item_name, item_name_list, item_num_list, word_size_range):
wordcloud = WordCloud(width=1400, height=900)

wordcloud.add("", item_name_list, item_num_list, word_size_range=word_size_range, shape='pentagon')

# 保存云图
analyse_path = './analyse/'
if not os.path.exists(analyse_path):
os.mkdir(analyse_path)
out_file_name = analyse_path + item_name + '.html'
wordcloud.render(out_file_name)


def get_tag(text, cnt):
print('正在分析句子:', text)
tag_list = jieba.analyse.extract_tags(text) # jieba分词
for tag in tag_list:
cnt[tag] += 1


def counter2list(_counter):
name_list = []
num_list = []

for item in _counter:
name_list.append(item[0])
num_list.append(item[1])

return name_list, num_list


if __name__ == '__main__':

in_file_name = './data/friends.json'
with codecs.open(in_file_name, encoding='utf-8') as f:
friends = json.load(f)

# 待统计参数
Signature_counter = Counter() # 个性签名关键词

for friend in friends:
# 出去停用词,emoji、class、span
signature = friend["Signature"].strip().replace("span", "").replace("class", "").replace("emoji", "")
# 签名关键词提取
get_tag(signature, Signature_counter)

# 微信好友签名前200个关键词
name_list, num_list = counter2list(Signature_counter.most_common(200))
word_cloud('微信好友签名关键词', name_list, num_list, [20, 100])

最终结果如下,在一堆向上和小清新的关键字里面,让我眼前一亮的居然是第二行的dotaer,我果然是凭实力单的身。
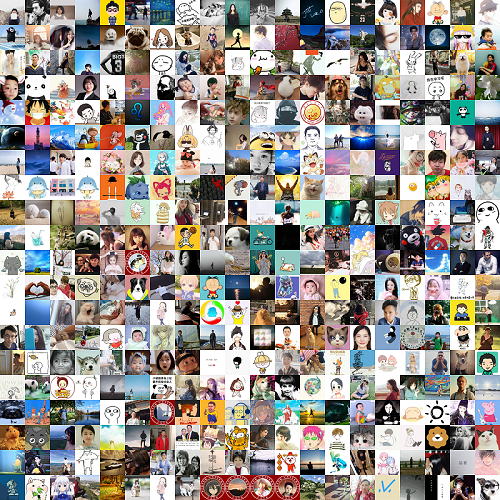
合成头像

最后将所有好友头像聚合为一张图,代码如下:

1
2
3
4
5
6
7
8
9
10
11
12
13
14
15
16
17
18
19
20
21
22
23
24
25
26
27
28
29
30
31
32
33
34
35
36
37
38
39
40
41
42
43
44
45
46
47
48
49
50
51
52
53
54
55
56
57
import math
import os
import PIL.Image

print("正在合成头像")
# 对用户头像进行压缩
photo_width = 200
photo_height = 200

# 图像路径list
photo_path_list = []

# 获取当前路径
dirName = os.getcwd() + '/images'
# print(dirName)
# 遍历文件夹获取所有图片的路径
for root, dirs, files in os.walk(dirName):
for file in files:
if "jpg" in file:
photo_path_list.append(os.path.join(root, file))

# print(photo_path_list)
pic_num = len(photo_path_list)
# 每行每列显示图片数量
line_max = int(math.sqrt(pic_num))
row_max = int(math.sqrt(pic_num))

if line_max > 20:
line_max = 20
row_max = 20

num = 0
pic_max = line_max * row_max

toImage = PIL.Image.new('RGBA', (photo_width * line_max, photo_height * row_max))

for i in range(0, row_max):

for j in range(0, line_max):

pic_fole_head = PIL.Image.open(photo_path_list[num])
width, height = pic_fole_head.size

tmppic = pic_fole_head.resize((photo_width, photo_height))

loc = (int(j % row_max * photo_width), int(i % row_max * photo_height))
toImage.paste(tmppic, loc)
num = num + 1

if num >= len(photo_path_list):
break

if num >= pic_max:
break

print(toImage.size)
toImage.save('./analyse/merged.png')

运行结果:

Python包清单

本文全过程在Python3环境下进行,主要依赖包如下:

  • pillow: pip install pillow
  • pyecharts: pip install pyecharts
  • itchat: pip install itchat
  • jieba: pip install jieba

我为什么单身

可能是太帅了吧,哈哈哈,

应该是太厚脸皮了。

BJTU-HXS wechat
海内存知己,天涯若比邻。